
This is a review for the
Science4Us.com online science program. We received the
Science4Us.com Online Subscription for six full months and covers the entire website. I have to say in advance, I was really impressed with this website! We absolutely love it! It was exactly what we were looking for and I am so glad we had this opportunity to use it! While this program is intended for children in grades K-2, my daughter who is a preschooler was able to use this program with ease. This may be because science is her favourite subject, so not every preschooler may be ready for this program. Children who are in 3rd or 4th grade may still find this online program helpful for reviewing purposes.
This is a great online science programs for young children since it is a full curriculum and it's affordable. It's $7.95 per child per month. You don't have to purchase any additional materials, although you may want to create some of your own activities or experiments to go along with the offline activities. We really enjoy hands-on activities, especially because my son is too young for some of the offline activities that come with this program (although this curriculum was not intended for a child his age), which is why we modify the activities so he can follow along more easily.
One requirement for the offline activities is a printer, preferably a colour printer since most of the images are coloured. We only have a black and white printer, so that is what we have to use and it works fine for us. But the pictures would definitely look a lot better if they were in colour. For example, the pictures below would certainly be nicer if they were in colour, but they still work for their intended purpose and my kids don't mind. Worse case, we can always colour them in! (And Bean did fantastic on the test! Her galaxy may look like a scribble, but she said her galaxy had lots of circles and stars and planets - which are the dots.) And the other requirement that isn't completely necessary is a laminator. Some of the pages suggest you laminate the pieces and we did for the most part. But the rest we left unlaminated.


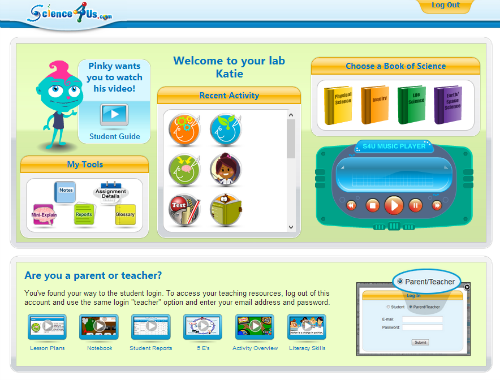
This is a type of program that can be used with multiple students, since it has a teacher and student section. The teacher can track the progress of each of their students and it even keeps track of their grades. We have not used this feature too much because my daughter isn't yet old enough to use the computer on her own. She was able to use the controls on each of the videos though (pause, play, continue, etc), but she had difficulty with the on screen activities (like draw a red vegetable or draw a line to the pictures that match) simply because she doesn't have much practice drawing with a mouse or touch pad. For these parts of the activities I had some drawing paper handy and the correct colour crayon or marker. The videos were also a great way to introduce the subject (physical, inquiry, life, earth/space) and familiarize the student with the subject material. So while the course is online for the most part, there is plenty to do after watching the video.
I read through many of the teacher guides and found them really helpful. For someone who is fairly new to teaching, they were essential. They showed you how to present the topic to the student(s) and gave examples of questions to ask the student(s) and what kind of examples to use when explaining the topic. With each topic they have a teacher guide and the students offline activities that go together and the teachers guide tells you what the lesson is about, suggestions on how to use the offline materials and follow-up questions for the students. There is also an assignment area where you can assign specific lessons to individual students and you can keep track of their progress with the student reports, which are recorded for you by the website. So the website keeps track of everything for you, which I expect is handy for a large family or classroom.
We started with Life Science - Living and Nonliving and spent two weeks watching the videos and completing the offline activities. This subject led to learning about the weather and then to space. I try to teach in a child-led and directed manner, so when their interests change I go with it. They are still learning all the basics, so I find it great that their curiosity always leads to more discoveries and learning experiences.
Here are a few pictures that I took of their Living and Nonliving offline activities. These were all grouped by Bean. I told her how to complete the activity and read where things went and she placed the pieces. These were all laminated later that day and these are being saved so we can revisit them whenever we decide to work on living and nonliving things again.


A few weeks ago Bean suddenly became interested in the solar system and we decided to quickly finish the Living and Nonliving unit and moved on to the Earth/Space unit. One of the reasons why this website is fantastic is because you can move to whichever section you want whenever you want, meaning you can work at your own pace. The website has an easy to navigate page system and you can either use the teacher view or the student view. We mainly used the teacher view, since I did most of the button pressing. But the student view was easy enough for my daughter to navigate on her own if my son needed attention with his own activity. We have not tried using this on our tablet, but I believe that would eliminate most of the issues she was having. (They have an iPad App coming out soon, and hopefully an Android App will follow soon after, because that would be fantastic! We would definitely use it and it would be much easier for Bean to use the App on a tablet.) We also typically used our laptop, because that way the kids could sit next to each other at the kitchen table and be able to watch the video and complete the offline activities without distractions. My son is a bit too young for some of the activities, but he still participated where he could. He mainly enjoyed the online memory games and a few of the activities that involved sorting and matching.


We use this website 3 days a week (Tuesday, Thursday and Saturday) for about an hour or two, depending on how long the video and offline activities take. We also created a few of our own activities to go along with the online lessons. For instance, we created a
weather felt board when we were exploring Earth and the atmosphere and a
moon phases felt board to learn the names and positions of the moon as seen from the earth. The whole solar system is next!
Bean is incredibly fascinated by space, so we use felt boards as a hands-on learning tool to learn while playing. This is one of the ways we like to incorporate play into our homeschooling learning experience. By using the weather felt board every morning they are able to track the weather patterns throughout the day while learning the names of the weather (snow storm, hail, rain shower, etc). It's also fun for them to predict what the weather might be like at night based on the weather earlier in the day. Or tracking the phase of the moon each day. We enjoy taking what we learn from the website and using it in our own way.
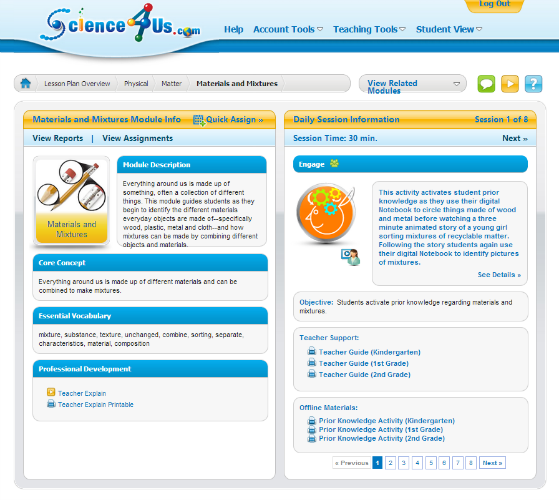
As you can see in the pictures above and below, the Science4Us.com website has a great design! Everything is organized in an easy-to-find way. We like that each subject is divided into different lessons that way we can spread them out over the course of a week or two. It is probably easier to keep track of your place and progress if you are signed in as the student. But since we mainly used the teacher's view I made sure to bookmark the current page we were on. Since there were eight lessons in every category we decided to aim to complete two on each of our science days, which means it took roughly four days to complete. Since we alternate our science lessons with our piano lessons during the week and Sunday is our relax and play day, that meant that two days were skipped before they could finish the module. That hasn't turned out to be an issue for us.
The website is also really colourful! I'm pointing this out because it's the very first thing my daughter said when I showed her. The activities are also colour-coded and use the same image to symbolize each lesson, so it's easy for her to select which one she wants.
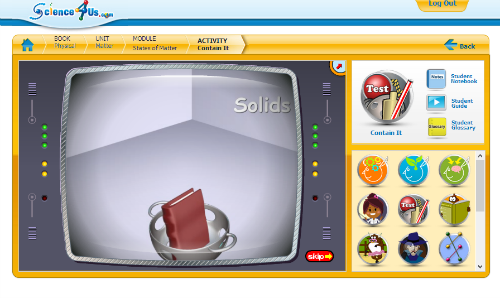
The lessons are really in depth and do a great job explaining scientific concepts to children. The lessons each have a different focus, like "engage", "explore", and "explain". For the engage part they can watch the video and then use what they just learned to draw a picture. Then they explore the subject by observing it. And then they watch the explanation and can apply what they learned. They also have additional videos and activities that go along with the subject, with names like "silly bulls", a syllables activity, "match up", "alphabetize" and "memory match". The games were a fun way to apply and review what they had just learned about the subject. This was the part were Munchkin became more involved in the activities, because he is at a stage where he really enjoys matching and categorizing things. Bean loved assisting him during these activities and showed him how to do them.
And that's another reason why we love the
Science4Us.com website! It doesn't
just focus on science, it also adds in literacy and math skills. It's a well-rounded curriculum that works well for us. They add in so many different aspects and cover a lot of information. My preschooler does so well with this! We are able to work on sight words and simple math activities while learning about science.
Would I recommend this program to other homeschooling families or classrooms? Yes, most definitely! My preschooler loves the program and I bet she will love it next year as well. The way it is presented is very engaging for young children and I think they would like the online and offline activities equally.
Since we are still fairly new to homeschooling (first year for my preschooler), I knew that finding curriculum to fit our needs and styles would be hard. I spent the summer researching different programs and had not been able to find the perfect science curriculum for my daughter. She's an avid learner and adores science and math. So it was important to us to find something that would work well for her. But I noticed that there weren't that many options for preschool science. This particular website is intended for Kindergartners to 2nd graders (homeschool or regular school), but because she has been exposed to science lessons and experiments for a while already, I knew she would be ready for this course. She still surprises me every day with how much she has learned. And her curiosity grows every day! It really makes me happy as a homeschooler to see her so excited about learning. With over 350 lessons and activity pages to choose from, I know we will be kept busy! This is exactly the kind of curriculum we want to use for the next few years!
Check out more reviews on
Science4Us.com by the TOS Crew!


If you enjoyed this post, follow along with us on
Facebook and Pinterest or subscribe by email or Bloglovin'!

 does not work well on solid black (I mean, it does work, but it is faint and you have to hold it at an angle in bright light to really see it), so I just pinned the pattern to the felt
 (aren't those pins adorable?) and cut around it.


