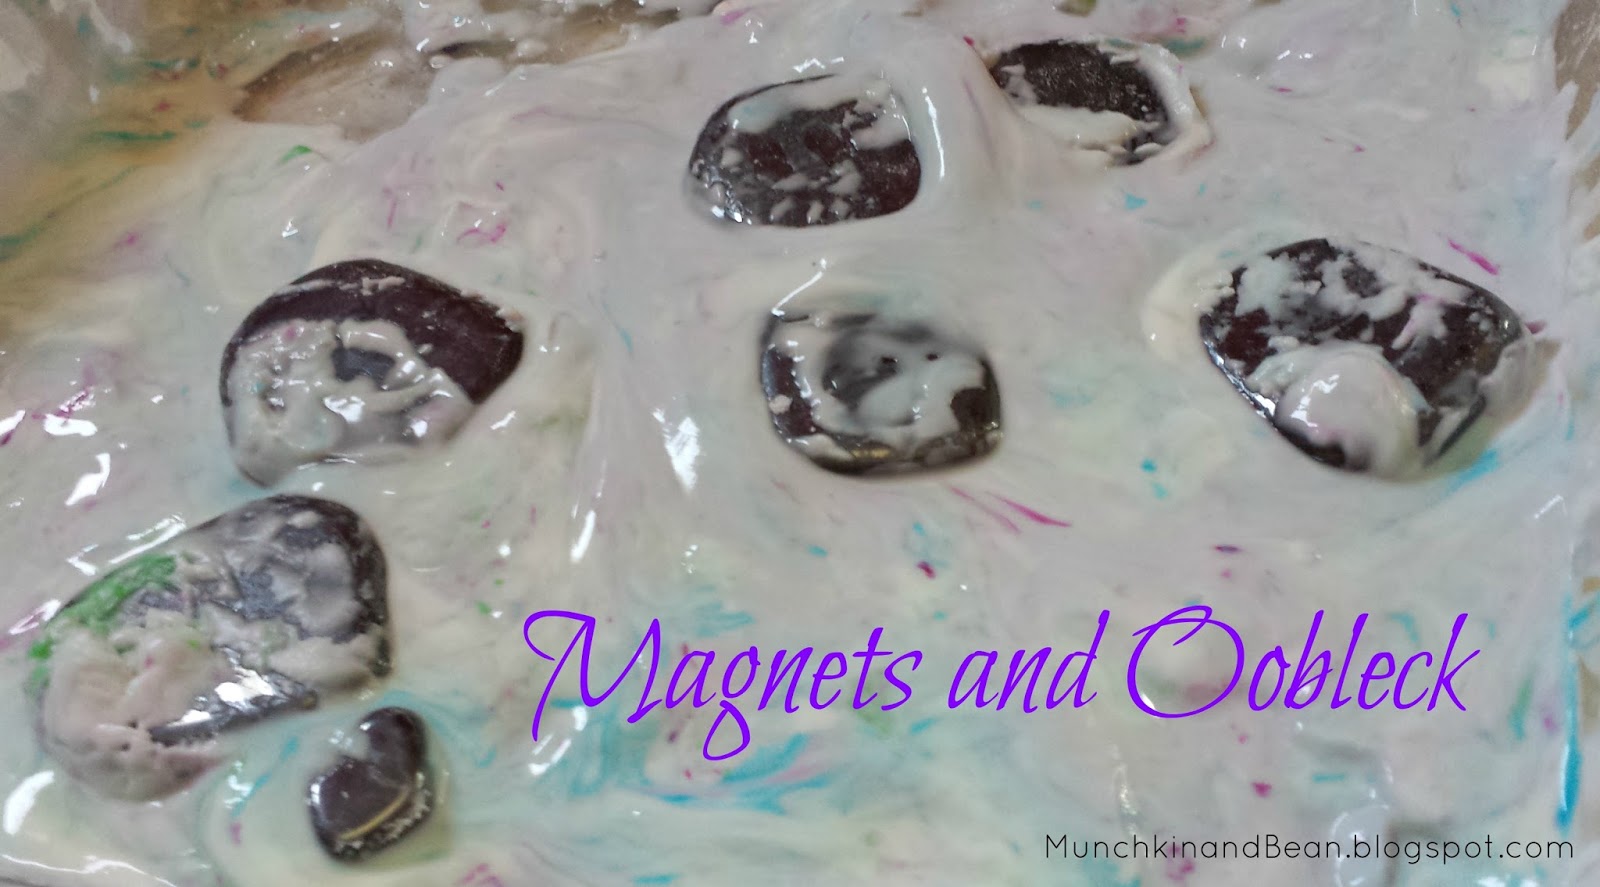
Once again we are keeping things simple by using two ingredients to create a fun activity! A while ago when we were creating our oobleck swamp, we discovered that magnets are so fun to watch when they are dropped into a container of oobleck!
Just to add a bit more to this activity, I let Bean pick out a few colours and she chose light blue, purple and green food colouring. This activity can certainly be made without food colouring though. We did this activity many times "plain" because we spent the last week working with black and white colours, like in our marbles and spools activity. But now we are back to playing with mixed colours!
I used one package of cornstarch (cornflour) and mixed in some water to make oobleck. To mix it together, we usually use 1 part water to 2 parts cornstarch. But use your own judgement because the measurement is not perfect. We mixed it together in a large glass pan and then added a drop of each of the food colours (the many speckles was because we were using up the last of the green and it sprayed everywhere). This makes the colours fun to watch as well, because as the oobleck is played with and the magnets move through the colours, they will swirl around and combine to create pretty new shades!
Then add in the magnets! We used small and large sized hematite magnets, which are Munchkin's favourite. Every time we see them in the store, it's the only thing he wants. So we have quite a few different shapes and sizes. Not to mention, in an activity like this, they are very easy to clean afterwards!
These two love this activity! Not only is oobleck their favourite sensory material to play with, but we all love (almost obsessively) to play with magnets, so this activity is fun on so many levels! Magnets and oobleck can be played with on their own, but together they create a unique experience.
The magnets work the same, even when coated in a thick layer of oobleck. The oobleck sucks the magnets right in and holds them, like quicksand. Which means that it can sometimes be difficult to pull them out, depending on how deep they are.
The incredible thing is that when you leave them alone, they will all slowly move towards or away from the other magnets, depending on which way they are facing in the oobleck. Another cool thing is that if you hold a magnet above them, they will move to get closer, which means you can make a magnet stand right up!
I recently picked up a packet of small wooden spools at our local craft store because I figured we could use them for some fine motor skill activities and crafts. So far they have been used for practicing threading on pipe cleaners (which is always a favourite fine motor activity). But ever since I brought out the marbles.. It was all over for the pipe cleaners! Marbles are just so much fun to play with! And it turns out that marbles and spools go really well together.
Marble speedway, anyone?
If the expression on his face does not convince you that this was a really fun activity, I don't know what more I can say. Both of my kids thoroughly enjoyed this entire activity and since we began playing with them earlier this week, they have played with them every day since. We actually haven't needed to put them back on the shelf and have left the marbles and spools in a wicker basket on this platter on the table, so they are easily able to access them.
So how can you use them together? Well, you can stack the spools to practice balancing and then put a marble on top to see how much weight can be supported. The highest we managed was 8 spools before it would collapse under the marble! You can practice counting while you stack them, which we did.
Munchkin lined up the spools and then added the marbles, always one colour.
We created a few different shapes, like this triangle, as well as squares, circles, hearts and crescents.
Bean is interested in patterns, so she mixed and matched the marbles to make simple patterns.
Munchkin is really beginning to enjoy fine motor activities that require concentration. The spools and marbles are small, and he was so very careful placing each marble on the spools.
Bean used a few of our paint trays to create patterns using the marbles.
We also used a piece of cardboard that had been hole-punched around the edges. We have a few different shapes, including circles, squares and triangles. The kids sometimes use these to colour on, but typically we use them to practice lacing with yarn. Now they have another new purpose, and that's as a pattern-making fine motor activity. :)
After they had been stacking spools for a while, they realized they could create standing shapes as well! They made a triangle, square, rectangle and trapezoid.
But stacking them up like this was definitely the highlight of the stacking activities!
The Leaning Towers of Marbles.
And of course we had to go blowing! The kids have a much bigger set of bowling pins and balls, but they don't use it too often. The bowling pins are more commonly used as bonking weapons. This smaller version was easier to contain and it has been helping Bean learn to flick things. Although that may sound like a weird skill to teach, it has come in handy. Bean could not figure out how to flick a penguin around on one of her learning apps, but now that she has had some practice playing mini-bowling, she is a pro at it! Not to mention, this game is fun for practicing hand-eye coordination.
It was a messy hair day for Bean, but that didn't stop her from bowling! She played the game backwards for a while until I showed her how to flick the marbles enough times that she was confident trying it on her own. Despite having to rebuild the spool target every other minute, they played mini-bowling for almost an hour!
The wooden spools were also used for fine motor threading practice. Munchkin uses pipe cleaners, since they are easier to hold and thread with. Bean has moved on to yarn, thick threads (usually my DMC floss, because I'll probably never have time to cross stitch again) and her favourite, shoelaces.
Threading can be very exciting! Munchkin does not like to reuse the same pipe cleaner, so he will request a new one each time he has loaded one up. This means that sometime we have several pipe cleaners lying around that are full of beads or spools that I can't remove until he has forgotten about them. :)
We made so many Discovery Bottles today! What's the occasion? Munchkin and Bean's half-brother just turned one! He is such a little cutie and loves all the sensory play we do around here. So I decided to create a big box of fun sensory play activities for him. Included in that box are these sensory bottles. I chose small bottles so that his little hands could easily hold them and none of them were too heavy. A few were filled with water, so I kept the rest of the contents light.
Now, I knew I was going to be making a couple, so I have been saving a few bottles here and there. We ended up using Mott's Apple Juice bottles and small Vitamin Water bottles. I chose these bottles in particular because the plastic is thick and feels sturdy. I also like that they have grooves to make interesting sounds and are easier to hold.
Bean mostly watched us create these, but Munchkin was happy to assist. He is normally the onlooker, so it was fun to create these sensory bottles with him. It ended up being a perfect activity to help his developing fine motor skills. He enjoyed picking out everything that was put into the bottles and added all the treasures himself!
To prepare the bottles I peeled off the labels and let them soak before cleaning off the glue. Typically I just scrub the glue off, but that is time consuming and I thought, "Google must have a solution!" Of course Google had a solution. What doesn't Google know? It turns out vegetable oil works perfectly for the task of removing the glue. Who knew? I certainly didn't! And I am pleased to say this wasn't a failed experiment. Within a few minutes all the bottles were rubbed free of glue and rinsed and I set them out to dry. (Sorry for the lack of pictures for this part, but my hands were full helping Munchkin clean the bottles. He insisted and was very cute diligently playing with the soap bubbles and shaking water everywhere. I did the vegetable oil part by myself because I didn't want it on his hands.) I hot glued the bottles shut when we were done making each of them, which is to prevent accidents.
We made several different bottles and were not going for anything in particular. I simply showed Munchkin the bottle and asked him what he wanted to put in it. He ran over to the craft shelf and pointed to what he wanted to add. I did tell him that the bottles were going to be given to little S so he couldn't keep them, but I promised him that we could make him a special one afterwards! He was perfectly fine with this and had so much fun making them with me! We worked on this project for about four hours, which is crazy because he rarely shows interest in anything for that long. He really enjoyed making them and stopped after each one was completed so he could play test them. All of them were Munchkin approved!
And now that I know how much he loves them, we will definitely be making more of our own soon! We have made a few in the past, but these new ones were super fun to play with, especially Munchkin's special one!
So here are the ones that we made ~
Using Mott's Apple Juice bottles.
Using small Vitamin Water bottles.
Enjoy some close-ups of these fantastic sensory bottles!
Alphabet pasta and colourful buttons of various sizes.
Ribbons in water. We used four different colours with different textures.
Beads in water. Munchkin hand-picked each of the beads! Hence why the bottle is only about 1/4 full of beads, because he eventually got impatient and put the top on to show that he was done.
Brown packing paper that had interesting cuts in it (sorry, not sure if there is a specific name for this type of packing paper!) with ground coffee and basmati rice (which Munchkin totally snagged off the pantry shelf!). This bottle is really fun to shake because it makes interesting sounds and is fun to watch everything trickle into the paper and out the other side.
Pom poms and air! There are two of each colour, which can later be used in a colour matching activity! Or a simple I-Spy colour game.
Water and oil and glitter and sequins, oh my! Please note that I used vegetable oil and definitely should have added at least a drop or two of food colouring to get rid of the oily colour that settles at the top. I will use baby oil in the future, which is clear and would get rid of the need to add colour to this bottle. However, when it is shaken up, you don't notice it at all.
Water and blue water beads and a squishy fish. What I like about this bottle is that the fish has to wiggle through the water beads to swim around! Just flip the bottle around and watch him swim to the top.
Beach bottle with sand, various sea shells, sea glass and small river rocks. Munchkin picked out all the shells and sea glass and probably would have picked out each individual rock if I hadn't shown him how to add a handful at a time. :) He did pour in the sand though.
And now for Munchkin's special bottle! Cut pipe cleaners and water! This bottle is heavy and I wouldn't recommend it for a younger child. Munchkin is kind of a brute and if I had left the pipe cleaners in there with only air the bottle would have been quickly destroyed! However, since it is heavy from all the water, he will leave it on the table or roll it on the floor while he plays with it. Lemme just say, magnets are the coolest thing for Munchkin. Sure, he loves his cars and his trains and his stuffed polar bear... but magnets amaze him, intrigue him, make him curious about what sticks to them or what they stick on. He will spend so much time wandering around the house holding out his magnets to see what they will react to. And magnets are just fun to play with in general.
So here is his own special magnetic sensory bottle! We used a 2 liter filled with water and about 12 cut-up pipe cleaners of different colours and types (some were sparkly, others were thin or fluffy). Most we left straight, but a few we bent into spirals or zig-zags.
Small magnets work just fine.
But big magnets definitely pick up more!
Even Bean (who was in her own world tracing letters on her tablet for most of this time) had to come over and check it out.
Munchkin discovered that he could balance the magnets on top of the bottle (with my help holding the bottle steady) and was so amazed at how much they pick up!
So, are sensory bottles fun to play with? Definitely! Are they easy to make? Yes! Sensory bottles are sure to delight! Check out that look of complete concentration as Munchkin balances the bottle and spins it to make the fish swirl around. :)
In the future we plan to make these sensory bottles (and you'll notice how my children have different preferences):
- a "rain stick" bottle with tooth picks and small grains (for Bean)
- a "rain stick" bottle with tooth picks and coloured rice (for Munchkin)
- white sand with colourful feathers (for Munchkin)
- natural sand with natural feathers (for Bean)
- planets and black aquarium rocks (we will most likely use the planets we saw on the Safari Ltd. website, if they fit - for Bean)
- glow in the dark planets and stars with black sand (for Munchkin)
- Autumn themed bottle with different coloured fake leaves and foam pumpkins and/or fall gaurds
- ABC themed bottle, with alphabet beads and sand
- 123 themed bottle, with number beads and sand
- I-Spy bottle with sand or rice/small grains with small objects (the Safari Ltd. minis would be perfect for this!)
- Colour themed bottles - each bottle would be for a different colour
Just a few of my ideas... And I will most likely post about them all in the future!
Please note that no sharp or harmful objects were added to these bottles. And all of the bottles were sealed with hot glue, but that does not make them 100% safe. Accidents happen. So please pay close attention to your child/children when they are playing with sensory bottles.
If you enjoyed this post, follow along with us on Facebook andPinterest or subscribe by email or Bloglovin'!